
Introduction
This time let’s try interfacing the Arduino UNO microcontroller to display text / characters using LCD 2004 (20 × 4) or 1602 (16 × 2) which is already equipped with an I2C module.
Kelebihan dengan memanfaatkan modul I2C untuk LCD ini, kita hanya membutuhkan 2 IO port (SDA & SCL) selain VCC dan GND. Dengan demikian akan menghemat IO port pada Arduino sehingga bisa digunakan untuk keperluan yang lainnya.
And coincidentally on the Arduino UNO board, IO port header pins are available in the order in which the 20 × 4 LCD I2C header.
Required Hardware
Equipment that must be prepared in the LCD programming tutorial using I2C LCD Backpack, among others :
- Arduino UNO + Data Cable USB
- LCD2004 (20 × 4) or LCD1602 (16 × 2) which is already equipped with an I2C LCD Backpack module.
- Cable Jumper
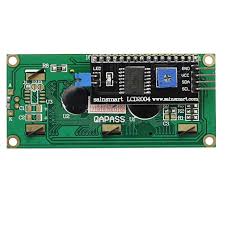
The following is a picture of the LCD20x4 which is equipped with an I2C LCD Backpack module :
Connection / Wiring Diagram
| I2C LCD 20×04 / I2C LCD 16×02 | Arduino UNO |
| VCC | 5V |
| GND | GND |
| SDA | SDA |
| SCL | SCL |
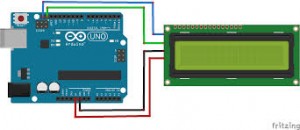
If it has been arranged between Arduino UNO and LCD according to the header pins that are on each of them as shown in the following image :
Program Code
Previously, first download the library for the I2C LCD Backpack :
Once downloaded, extract the library and copy it into the library folder of the Arduino IDE. If the Arduino IDE is open, close it and run it again. Then upload the sketch below to the Arduino UNO board :
#include <Wire.h>
#include <LiquidCrystal_I2C.h>
LiquidCrystal_I2C lcd(0x27, 2, 1, 0, 4, 5, 6, 7, 3, POSITIVE); // Set the LCD I2C address
/*—–( Declare Constants )—–*/
//none
/*—–( Declare objects )—–*/
// set the LCD address to 0x27 for a 20 chars 4 line display
// Set the pins on the I2C chip used for LCD connections:
// addr, en,rw,rs,d4,d5,d6,d7,bl,blpol
void setup() {
// put your setup code here, to run once:
Serial.begin(9600); // Used to type in characters
lcd.begin(20,4); // initialize the lcd for 20 chars 4 lines and turn on backlight
// ——- Quick 3 blinks of backlight ————-
for(int i = 0; i< 3; i++)
{
lcd.backlight();
delay(250);
lcd.noBacklight();
delay(250);
}
lcd.backlight(); // finish with backlight on
//——– Write characters on the display —————-
// NOTE: Cursor Position: CHAR, LINE) start at 0
lcd.setCursor(3,0); //Start at character 4 on line 0
lcd.print(“Hello, world!”);
delay(1000);
lcd.setCursor(2,1);
lcd.print(“From YourDuino”);
delay(1000);
lcd.setCursor(0,2);
lcd.print(“20 by 4 Line Display”);
lcd.setCursor(0,3);
delay(2000);
lcd.print(“http://YourDuino.com”);
delay(8000);
// Wait and then tell user they can start the Serial Monitor and type in characters to
// Display. (Set Serial Monitor option to “No Line Ending”)
lcd.setCursor(0,0); //Start at character 0 on line 0
lcd.print(“Start Serial Monitor”);
lcd.setCursor(0,1);
lcd.print(“Type chars 2 display”);
}
void loop() {
// put your main code here, to run repeatedly:
{
// when characters arrive over the serial port…
if (Serial.available()) {
// wait a bit for the entire message to arrive
delay(100);
// clear the screen
lcd.clear();
// read all the available characters
while (Serial.available() > 0) {
// display each character to the LCD
lcd.write(Serial.read());
}
}
}
}
After the sketch / program code has been successfully uploaded, if the LCD flashes or blinks 3 times, it means that the I2C LCD program has succeeded. For new LCDs, you usually need to adjust the brightness or contrast by turning the blue trimpot behind the I2C LCD Backpack so that the writing can be seen clearly.
If the LCD does not blink 3 times, most likely because the I2C address is wrong. There are a number of I2C LCD Backpack modules that are on the market, in principle it’s the same only difference is the I2C address.
Follow the guidelines in the following article to find out what the actual address of your I2C Backpack is :
Quite a lot of LCDs on the market with various models, each of which has its own advantages. For that we need to choose and adjust to our needs.
As a reference, the article below is presented and reviewed with examples of programs from several LCD models on the market :
- Interfacing 2.4 inch TFT LCD Touchscreen Denngan Arduino UNO
- Interfacing OLED LCD With Arduino
- Interfacing Graphic LCD ST7920 with Arduino
+++ May be Useful +++
Leave a Reply