
Description Regarding the GY-906 MLX90614 Module
MLX90614 is an infrared thermometer for non-contact temperature measurements. Both the IR sensitive thermopile detector chip and the signal conditioner ASIC are integrated in the same model TO-39 sensor packing. The signal conditioner integrated into the MLX90614 is a low noise amplifier, 17-bit ADC and a powerful DSP unit so as to achieve high accuracy and resolution from the thermometer.
By default from the factory, the sensor is calibrated with a digital SMBus output which gives full access to the measured temperature in the complete temperature range with a resolution of 0.02 ° C.
The user can configure the digital output to be pulse width modulation (PWM). As a standard, 10-bit PWM is configured to continuously transmit the measured temperature in the range of -20 to 120 ° C, with an output resolution of 0.14 ° C.
One solution to building a sensor system that can measure high temperatures without damaging the system is to use contactless or non-contact temperature sensors. This sensor can feel the temperature of an object without touching the object.
Features and Benefits
- Non Contact
- Small size and low cost
- Easy to integrate
- Calibrated from the factory in a wide temperature range: -40 to 125 ° C for temperature sensors and -70 to 380 ° C for object temperatures
- High accuracy of 0.5 ° C over a wide temperature range (0 .. + 50 C for Ta and To)
- Medical accuracy of 0.1 ° C in a limited temperature range is available on request
- Measurement resolution of 0.02 ° C
- Single and dual zone versions
- Digital interface compatible with SMBus / I2C for fast temperature readings
- Adjustable PWM output for continuous reading
- Available in 3V and 5V versions
- Power saving mode
Pin Out Board
Here is a picture of the MLX90614 GY-906 board module that is widely available on the market.
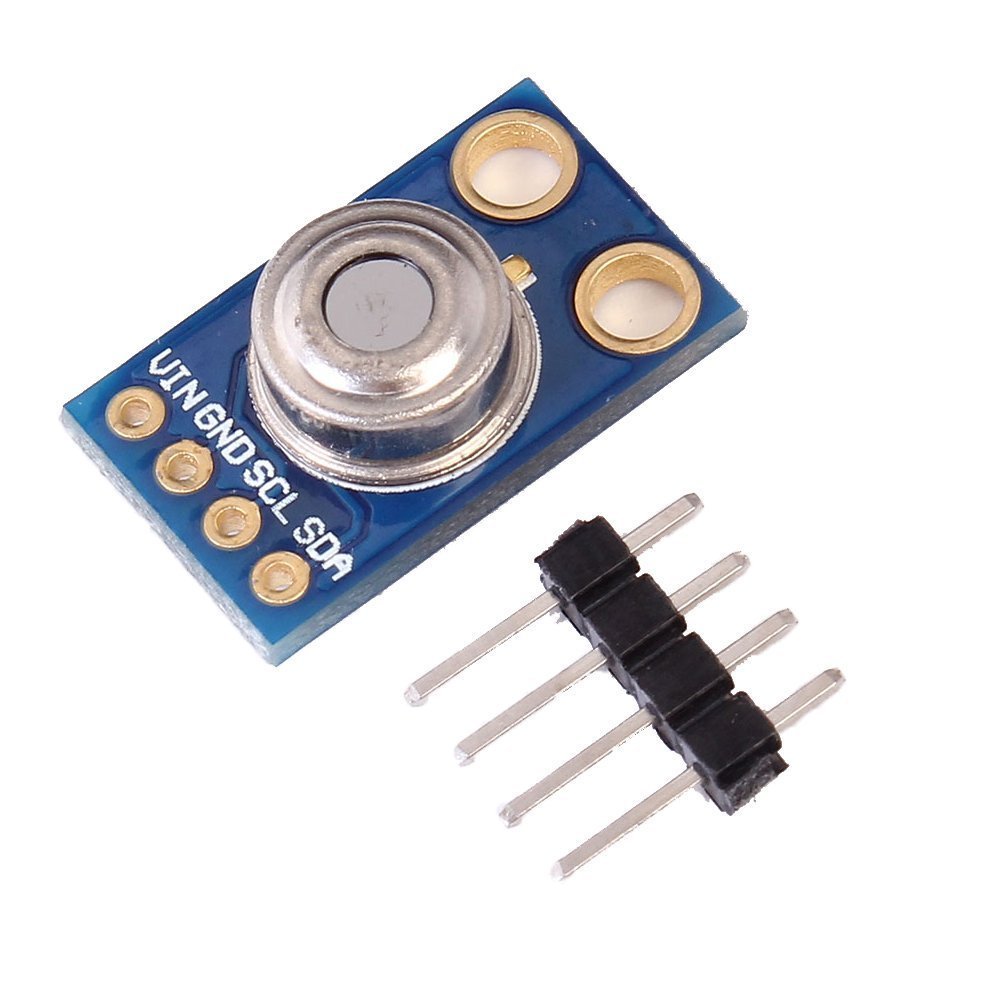
The pin out of the GY-906 board is as follows :
- Vin : Supply voltage of the module
- GND : Ground signal
- SCL : Serial Clock
- SDA : Serial Data
Diagram / Wiring Circuits
Next is the pin connection between the GY-906 and Arduino UNO.
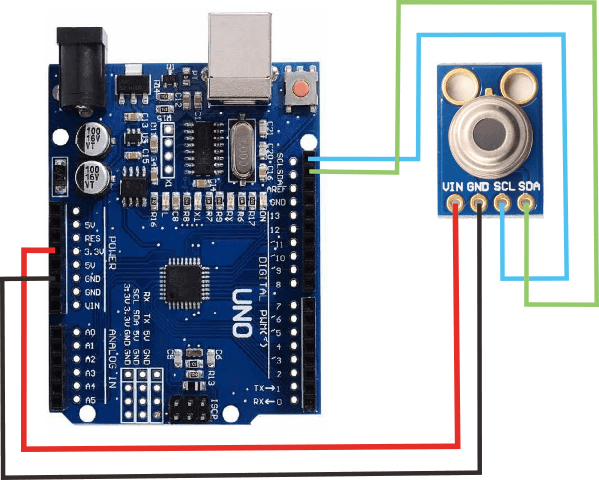
| GY-906 | Arduino UNO |
| Vin | +5V for modul tipe 5V +3V for modul tipe 3.3V |
| GND | GND |
| SCL | SCL / A5 |
| SDA | SDA / A4 |
Code Program and Library
Before we start the program code, make sure we have the GY-906 MLX90614 library from Adafruit available for download HERE or HERE.
We can use the sample program code from the default library to measure temperature or copy the code below :
/***************************************************
  This is a library example for the MLX90614 Temp Sensor

  Designed specifically to work with the MLX90614 sensors in the
  adafruit shop
  ----> https://www.adafruit.com/products/1748
  ----> https://www.adafruit.com/products/1749

  These sensors use I2C to communicate, 2 pins are required to
  interface
  Adafruit invests time and resources providing this open source code,
  please support Adafruit and open-source hardware by purchasing
  products from Adafruit!

  Written by Limor Fried/Ladyada for Adafruit Industries.
  BSD license, all text above must be included in any redistribution
 ****************************************************/

#include <Wire.h>
#include <Adafruit_MLX90614.h>

Adafruit_MLX90614 mlx = Adafruit_MLX90614();

void setup() {
  Serial.begin(9600);

  Serial.println("Adafruit MLX90614 test");

  mlx.begin();
}

void loop() {
  Serial.print("Ambient = "); Serial.print(mlx.readAmbientTempC());
  Serial.print("*C\tObject = "); Serial.print(mlx.readObjectTempC()); Serial.println("*C");
  Serial.print("Ambient = "); Serial.print(mlx.readAmbientTempF());
  Serial.print("*F\tObject = "); Serial.print(mlx.readObjectTempF()); Serial.println("*F");

  Serial.println();
  delay(500);
}
After the above program code is uploaded, we can see the measurement results by opening the Serial Monitor on the Arduino IDE. Turn the sensor towards the object you want to measure the temperature.
+++++ May be Useful +++++
Thanks for sharing your thoughts about front-end.
Regards
You’re welcome