
Deskripsi
In this article we will discuss the BH1750 light sensor along with examples of its program using Arduino.
BH1750FVI is an IC sensor that is used to measure the intensity of ambient light in a size or unit of lux. This sensor uses the I2C protocol for communication with a microcontroller or minimum system.
The detection range of this sensor is quite wide namely between 1 – 65535 lux. 1 lux means 1 lumens of light intensity in an area of 1 square meter or when written in the equation becomes :
1 Lux = 1 Lm / m2
So that the BH1750 sensor can be used, it requires a few additional components such as a capacitor and or resistor for the purposes of resetting the internal timing of the sensor. In addition, there is also a regulator IC added for the purpose of step down from 5V to 3.3V so that it can use a 5V VCC voltage.
Fortunately, most BH1750 sensors available on the market are already in the form of modules that are ready to be used, so we don’t need to bother to think about the additional circuit.
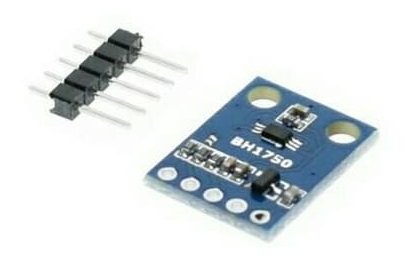
The following is an example image of a BH1750 light sensor module :
Block Diagram
The figure below shows the internal block diagram of the BH1750 light sensor :
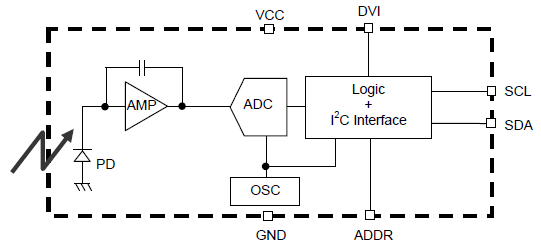
While the following table is a description of the block diagram above :
| Block | Description |
| PD | Photo diode with approximately human eye response |
| AMP | Integration-OPAMP for converting from PD current to voltage |
| ADC | AD converter for obtainment Digital 16bit data |
| Logic + I2C Interface | Ambient Light Calculation and I2C Bus Interface. It is including below register : Data Register : This is for registration of Ambient Light Data. Initial value is “0000_0000_0000_0000” Measurement Time Register : This is for registration of measurement time. Initial value is “0100_0101” |
| OSC | Internal Oscillator (320 KHz). It is CLK for internal logic. |
To learn more details about the BH1750 light sensor, please download the datasheet of the sensor at HERE.
Features
The following are the features of the BH1750 sensor :
- I2C Bus Interface (f/s Mode Support)
- Spectral Responsibility is approximately human eye response
- Illuminance to Digital Converter
- Wide range and High Resolution ( 1 – 65535 lx )
- Low Current by Power Down Function
- 50 Hz / 60 Hz Light Noise Rejection Funtion
- 1.8V Logic Input Interface
- Light Source Dependency is little
- It is possible to select 2 I2C Address
- Adjustable measurement result for influence of optical window
- Small measurement variation ( +/- 20% )
- The influence of Infrared is very small
Application
The BH1750 sensor is widely used in various electronic equipment such as :
- Mobile Phone
- LCD TV
- Note PC
- Portable Game Machine
- Digital Camera
- Car Navigation
- PDA
- LCD Display
- etc
Materials needed
The materials needed in this BH1750 light sensor programming tutorial include :
1. Hardware
- BH1750 Module
- Arduiono UNO / Nano / Pro Mini
- Some jumper cable M-F / FF
2. Software
- Arduino IDE that can be downloaded on the website arduino.cc
- The BH1750 library can be downloaded at HERE
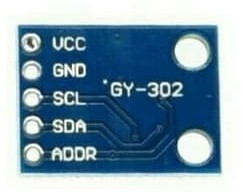
Connection / Wiring Diagram
| Modul BH1750 | Arduino UNO / Nano / Pro Mini |
| VCC | 3.3V atau 5V |
| GND | GND |
| SDA | SDA |
| SCL | SCL |
Program Code
After the Arduino IDE application is ready and the BH1750 library above is downloaded, extract and copy the library into the library folder of the Arduino IDE. Then for testing, open the default sample program or copy the sketch below :
#include <Wire.h>
#include <BH1750.h>
BH1750 lightMeter;
void setup(){
   Serial.begin(9600);   // Initialize the I2C bus (BH1750 library doesn't do this automatically)   // On esp8266 devices you can select SCL and SDA pins using Wire.begin(D4, D3);
   Wire.begin();
   lightMeter.begin();
   Serial.println(F("BH1750 Test"));
}

void loop() {
   float lux = lightMeter.readLightLevel();
   Serial.print("Light: ");
   Serial.print(lux);
   Serial.println(" lx");
   delay(1000);
}
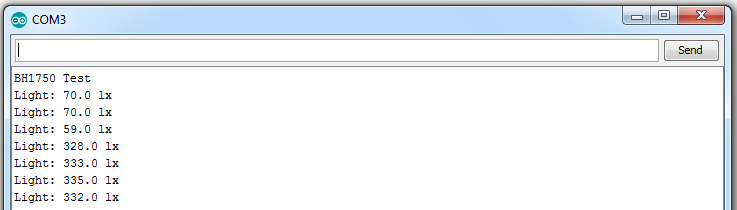
Output
After the sketch or program has been successfully uploaded to the Arduino board, open the serial monitor to see the output of the light reading from the BH1750 sensor as below :
+++++ May be Useful +++++
Like!! Really appreciate you sharing this blog post.Really thank you! Keep writing.