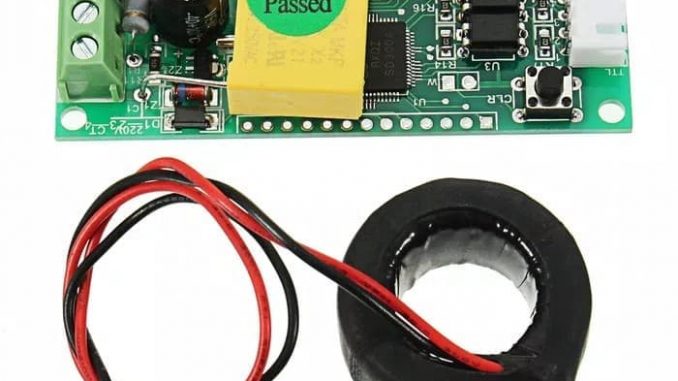
In the previous article, Getting to Know the PZEM-004T Electronic Module for Electrical Measurement Tools, we review the PZEM-004T Module in general and in detail, so in this article, we will try to directly learn how to interfacing and sample the PZEM-004T V2 module program using Arduino UNO or Arduino Mega2560.
If you use Arduino UNO, you can only use Serial Software for communication access with PZEM-004T V2. If you use Arduino Mega2560, you can use Serial Software or Serial Hardware for communication access with PZEM-004T V2.
In this article, the example program provided can only be used for interfacing with the PZEM-004T V2 module. If using the PZEM-004T V3.0 module, please open the article below :
Example of the PZEM-004T V3.0 Interfacing Program Using Arduino
Specifications / Features of PZEM-004T V2.0
Following are the features or specifications of the PZEM-004T V2 module :
A. Function
- Measurement function (voltage / current, current / active power).
- Energy clear / reset power button
- Power-down data storage function (cumulative power down before saving)
- TTL Serial Communication
- Power Measurement: 0 ~ 9999kW
- Voltage Measurement: 80 ~ 260VAC
- Current Measurement: 0 ~ 100A
B. Specifications
- Working voltage: 80 ~ 260VAC
- Rated power: 100A / 22000W
- Working Frequency: 45-65Hz
- Measurement accuracy: 1.0
Hardware Required
- PZEM-004T V2.0
- Arduino UNO or Arduino Mega2560
- Some M – F / F – F jumper cables
- Load can use TL Lights / Bulb / Electric Drill
Circuit / Wiring Diagram
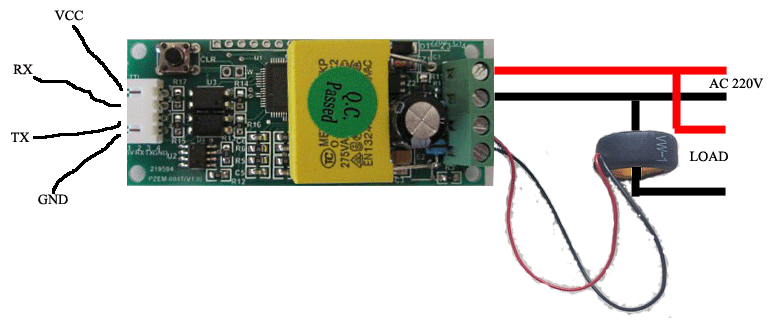
1. Connection Between PZEM-004T and Arduino
| PZEM-004T | Arduino UNO / Mega2560 |
| VCC | +5V |
| GND | GND |
| TX | RX (Software Serial / Hardware Serial) |
| RX | TX (Software Serial / Hardware Serial) |
2. Connection Between PZEM-004T and Load
The picture below shows the wiring or cable connection between the PZEM-004T with the MCU / Arduino and Load and AC 220V Power Source

Program Code
For programming PZEM-004T V2, there is already a library that we can use which can be downloaded at the link below :
After the PZEM-004T library above is downloaded, extract or unzip then copy it to the library folder of the Arduino IDE. If previously the Arduino IDE was already open, close it and run the Arduino IDE again.
Next, open the sample program or example from the PZEM-004T library or copy and paste the sketch program below :
#include <SoftwareSerial.h>
#include <PZEM004T.h>

PZEM004T pzem(10,11);  // (RX,TX) connect to TX,RX of PZEM
IPAddress ip(192,168,1,1);

void setup() {
   Serial.begin(9600);
   pzem.setAddress(ip);
}

void loop() {
   float v = pzem.voltage(ip);
   if (v < 0.0) v = 0.0;
   Serial.print(v);Serial.print("V; ");
   float i = pzem.current(ip);
   if(i >= 0.0){ Serial.print(i);Serial.print("A; "); }
   float p = pzem.power(ip);
   if(p >= 0.0){ Serial.print(p);Serial.print("W; "); }
   float e = pzem.energy(ip);
   if(e >= 0.0){ Serial.print(e);Serial.print("Wh; "); }
   Serial.println();
   delay(1000);
}
Or an example of a program that uses Serial Hardware below :
#include <PZEM004T.h>

PZEM004T pzem(&Serial1);    // Hardware Serial (RX1,TX1) connect to
                            // TX,RX of PZEM
IPAddress ip(192,168,1,1);

void setup() {
   Serial.begin(9600);
   pzem.setAddress(ip);
}

void loop() {
   float v = pzem.voltage(ip);
   if (v < 0.0) v = 0.0;
   Serial.print(v);Serial.print("V; ");
   float i = pzem.current(ip);
   if(i >= 0.0){ Serial.print(i);Serial.print("A; "); }
   float p = pzem.power(ip);
   if(p >= 0.0){ Serial.print(p);Serial.print("W; "); }
   float e = pzem.energy(ip);
   if(e >= 0.0){ Serial.print(e);Serial.print("Wh; "); }
   Serial.println();
   delay(1000);
}
After the above sketch program is uploaded to the Arduino board, open the Serial Monitor and the measurement results from PZEM-004T will appear on the Serial Monitor.
++++++++ May be Useful ++++++++
The link for the pzem-004tv2 library is not working. Can you give another link?
Thanks for the tutorials and future helps.
Hello, Thank you for the information. I have fixed the link for PZEM-004T V2 library.